Featured Products
-
Sale!

-
Sale!

-
Sale!

-
Sale!

-
Sale!

-
Sale!

-
Sale!

-
Sale!


Here is part 2 of my silhouette lesson. In the 1st lesson, I talked about where to meter, my settings, and how to position yourself and your subject. In part 2, I will cover how to edit the photos after you are done. And I will tell you a creative way to make your silhouettes stand out from the crowd.
Here is my Straight Out of Camera of a shot I used in part 1. You can see details in her clothing, such as stripes in the pants and letters on her cardigan. Also she is smack in the middle of the photo, which is not the best composition.

So starting from there, I ran “Color Burst Action” from the MCP Complete Workflow Set. The “paint on pop” layer helped paint on the richer jewel tones sunset. It brings out the color that was already there but not so obvious. Then I flattened the file and then duplicated my layer (ctrl or command + J) and used the burn tool. I painted with a soft edge airbrush, burning at 10% on the shadows only. This allowed me to quickly darken just the figure and left the background alone as shown below.

Then I cropped and here is my final shot:

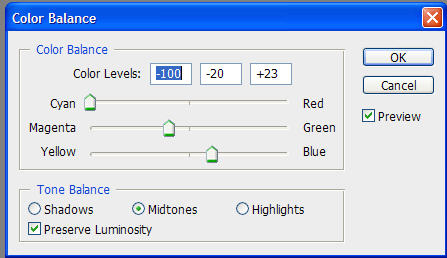
Now, for some creative plays. Just go under Layer – New Adjustment Layer – Color Balance. Then start sliding the colors around. Here are a few examples in screen shot form of how you can transform your photo. You can also play with hue/saturation adjustment layers and selective color. Plus in Lightroom you can do some really amazing things with color in this type of photo too. Have fun playing!!!

No Comments
Leave a Comment
You must be logged in to post a comment.


Recent Posts


So easy! So fun! Now all I need to do is get to the beach…Thanks – good stuff. 🙂
thank you so much for explaining this… i am going on vacation the 1st week of august and will try it…
I can’t wait to try out these tips next month while we are at the beach in Florida. I can only hope they look as good as yours do!
Thanks for explaining how to do this, it is so simple. I didn’t have a beach photo,but I had this one from a photo I took at my frieds horse show. It was taken under a closed arena and I thought it was a total loss, but thanks to you I think it turned out OK.